


Let’s assume that you are using the Blinn-Phong shader from this post and at some point in your game you don’t want to use the specular contribution for some reason. Then, what do you do? you set the Specular intensity to zero and problem solved. Visually, you achieved your result, however your shader is still doing the specular computation, but it is being nulled by the zero intensity. This is a simple example, but now imagine how much wasted computation you would have with a more complex shader with several different settings.
One can say that an ‘if’ condition could be used. Yes, but NO. Branching your shader code is terrible for its execution on GPU. There is a good and illustrated explanation about what happens here in section 3.7.
A solution for this problem is to create variants of your shader.
How does it work ?
While writing your shader, the pieces of code that you want to be able to enable/disable need to be placed between the following directives, where MY_MACRO is user-defined.
#if MY_MACRO

// ... some optional code ...

#endif
Then, you need to let Unity know that these pieces of code exist using the directive #pragma multi_compile. In our case, we would do
#pragma multi_compile __ MY_MACRO
So, what happens next? Now, Unity will compile two shaders for you. One without the MY_MACRO piece of code (specified by the __ int the #pragma) and other with the piece of code (specified by the MY_MACRO in the #pragma).
You can now select what shader to use at runtime by enabling/disabling the macro MY_MACRO using either Material.EnableKeyword()/.DisableKeyword() (per material) or Shader.EnableKeyword()/.DisableKeyword() (globally).
Upgrading the Blinn-Phong shader
Let’s upgrade our shader by creating four different pieces of code. One for each different contribution (Ambient, Diffuse, Specular Phong, Specular Blinn-Phong). Let’s use the following macros: USE_AMBIENT, USE_DIFFUSE, USE_SPECULAR_PHONG, USE_SPECULAR_BLINNPHONG. Now, we need to say to Unity that we want to have the following combination of pieces of code:
__
USE_AMBIENT
USE_AMBIENT + USE_DIFFUSE
USE_AMBIENT + USE_DIFFUSE + USE_SPECULAR_PHONG
USE_AMBIENT + USE_SPECULAR_PHONG
USE_AMBIENT + USE_DIFFUSE + USE_SPECULAR_BLINNPHONG
USE_AMBIENT + USE_SPECULAR_BLINNPHONG
USE_DIFFUSE
USE_DIFFUSE + USE_SPECULAR_PHONG
USE_SPECULAR_PHONG
USE_DIFFUSE + USE_SPECULAR_BLINNPHONG
USE_SPECULAR_BLINNPHONG
And how do we say that? By doing this:
#pragma multi_compile __ USE_AMBIENT
#pragma multi_compile __ USE_DIFFUSE
#pragma multi_compile __ USE_SPECULAR_PHONG USE_SPECULAR_BLINNPHONG
For each new multi_compile line, Unity will create a combination of the shader combination up to the previous line with this new line. I.e. the second multi_compile will create __ + __, __ + USE_DIFFUSE, USE_AMBIENT + __, USE_AMBIENT + USE_DIFFUSE; then, the third line will take those and combine each with __, USE_SPECULAR_PHONG and USE_SPECULAR_BLINNPHONG separately.
Be careful when creating variants, the combination of them can scale fast.
Once the code is setup, we can just enable/disable features via script like said previously. However, it would be very annoying if we needed to work with scripts every time we want to test some new feature of our shader. Luckly, Unity allows us to use some built-in property drawers (or build our own) to enable/disable macros directly from the shader inspector and I will show three ways of doing that. The first one involves using the ToggleDrawer in the property section of our shader. It will take the name of the variable, capitalize it and append _ON:
// Will set "_MYVARIABLE_ON" when checked.
[Toggle] _MyVariable ("My variable", Float) = 0
The second also uses the ToggleDrawer and it sets the macro that we specify (MY_MACRO, in this case):
// Will set "MY_MACRO" when checked.
[Toggle(MY_MACRO)] _MyVariable ("My variable", Float) = 0
The third uses the KeywordEnumDrawer and allows us to create a combo box with different options to set (I will use this for Specular selection in the final shader):
// Display a popup with None, Phong and BlinnPhong options.
// Will set USE_SPECULAR_NONE,  USE_SPECULAR_PHONG or USE_SPECULAR_BLINNPHONG.
[KeywordEnum(None, Phong, BlinnPhong)] Use_Specular ("Choose Specular", Float) = 0
In the end, our final code looks like this:
Shader "Unlit/BlinnPhongSV"
{
	Properties
	{
		_MainTex ("Texture", 2D) = "white" {}

		[Toggle(USE_AMBIENT)] _UseAmbient ("Use Ambient?", Float) = 0
		_AmbientIntensity("Ambient Intensity", Range(0,1)) = 1
		_AmbientColor("Ambient Color", Color) = (1,1,1,1)

		[Toggle(USE_DIFFUSE)] _UseDiffuse ("Use Diffuse?", Float) = 0
		_DiffuseIntensity("Diffuse Intensity", Range(0,1)) = 1
		_DiffuseColor("Diffuse Color", Color) = (1,1,1,1)

		[KeywordEnum(None, Phong, BlinnPhong)] Use_Specular ("Choose Specular", Float) = 0
		_SpecularIntesity("Specular Intensity", Range(0,1)) = 1
		_SpecularColor("Specular Color", Color) = (1,1,1,1)
		_Shininess("Shininess", Float) = 1
	}
	SubShader
	{
		// ForwardBase is needed to work with unity directional light
		Tags { "RenderType"="Opaque" "LightMode" = "ForwardBase"}
		LOD 100

		Pass
		{
			CGPROGRAM
			#pragma vertex vert
			#pragma fragment frag

			#pragma multi_compile __ USE_AMBIENT
			#pragma multi_compile __ USE_DIFFUSE
			#pragma multi_compile __ USE_SPECULAR_PHONG USE_SPECULAR_BLINNPHONG

			#include "UnityCG.cginc"

			struct appdata
			{
				float4 vertex : POSITION;
				float2 uv : TEXCOORD0;
				#if USE_DIFFUSE || USE_SPECULAR_PHONG || USE_SPECULAR_BLINNPHONG
					float3 normal : NORMAL;
				#endif
			};

			struct v2f
			{
				float2 uv : TEXCOORD0;
				#if USE_DIFFUSE || USE_SPECULAR_PHONG || USE_SPECULAR_BLINNPHONG
					float3 normal : TEXCOORD1;
				#endif
				float4 vertex : SV_POSITION;
				#if USE_SPECULAR_PHONG || USE_SPECULAR_BLINNPHONG
					float3 worldPos : TEXCOORD2;
				#endif
			};

			sampler2D _MainTex;
			float4 _MainTex_ST;

			#if USE_AMBIENT
				fixed3 _AmbientColor;
				fixed _AmbientIntensity;
			#endif

			#if USE_DIFFUSE
				fixed3 _DiffuseColor;
				fixed _DiffuseIntensity;
			#endif

			#if USE_SPECULAR_PHONG || USE_SPECULAR_BLINNPHONG
				fixed3 _SpecularColor;
				fixed _SpecularIntesity;
				float _Shininess;
			#endif

			v2f vert (appdata v)
			{
				v2f o;
				o.vertex = UnityObjectToClipPos(v.vertex);

				#if USE_DIFFUSE || USE_SPECULAR_PHONG || USE_SPECULAR_BLINNPHONG
					// Take the normal and convert to world space.
					o.normal = UnityObjectToWorldNormal(v.normal);
				#endif

				#if USE_SPECULAR_PHONG || USE_SPECULAR_BLINNPHONG
					// Take vertex position in world space.
					o.worldPos = mul(unity_ObjectToWorld, v.vertex).xyz;
				#endif

				o.uv = TRANSFORM_TEX(v.uv, _MainTex);
				return o;
			}

			fixed4 frag (v2f i) : SV_Target
			{
				fixed3 finalColor = fixed3(0,0,0);

				#if USE_DIFFUSE || USE_SPECULAR_PHONG || USE_SPECULAR_BLINNPHONG
					fixed3 normalDir = normalize(i.normal);
					// Light direction
					fixed3 lightDir = normalize(_WorldSpaceLightPos0.xyz);
				#endif

				#if USE_SPECULAR_PHONG || USE_SPECULAR_BLINNPHONG
					// Viewer direction. From camera position to surface position.
					fixed3 viewDir = normalize(_WorldSpaceCameraPos - i.worldPos);
				#endif

				#if USE_AMBIENT
					// Ambient
					finalColor += _AmbientIntensity * _AmbientColor;
				#endif

				#if USE_DIFFUSE
					// Diffuse
					// max is used to avoid shading surfaces that dont face the light.
					fixed dotNL = max(dot(normalDir, lightDir), 0.0);
					finalColor += _DiffuseIntensity * _DiffuseColor * dotNL;
				#endif

				#if USE_SPECULAR_PHONG
					// Specular Phong
					fixed3 lightReflection = reflect(-lightDir, normalDir);
					fixed dotLV = max(dot(lightReflection, viewDir), 0.0);
					finalColor += _SpecularIntesity * _SpecularColor * pow(dotLV, _Shininess);
				#endif

				#if USE_SPECULAR_BLINNPHONG
					// Specular Blinn-Phong
					fixed3 halfVector = normalize(lightDir + viewDir);
					fixed dotHN = max(dot(halfVector, normalDir), 0.0);
					finalColor += _SpecularIntesity * _SpecularColor * pow(dotHN, _Shininess * 4.0);
				#endif

				// You can try to add a new variant for this part.
				// Gamma correction, if needed.
				//finalColor = pow(finalColor, 1/2.2);

				fixed3 col = tex2D(_MainTex, i.uv);
				finalColor *= col;

				return fixed4(finalColor, 1);
			}
			ENDCG
		}
	}
}
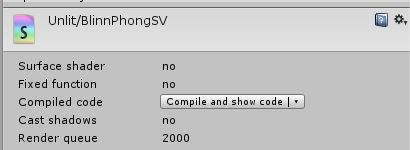
Note that every option will appear only in the settings where they are needed. For example, the normal be will declared and used only when USE_DIFFUSE, USE_SPECULAR_PHONG or USE_SPECULAR_BLINNPHONG are set. You can have an idea of the variants generated by your shader by selecting it and clicking on ‘compile and show code’. For this shader you will see 12 variants.
Final thoughts
Shader variants is a very powerful feature that you can use to create different variations of a shader in order to use sets of features only when they are needed and this way avoiding wasting GPU resources.
Despite its usefulness, we need also to be aware about the problems that shader variants can bring to our game:
- Like seen here, the number of variants can scale fast (10 multi_compile lines with 2 options each will generate 1024 variants).
- As the number of variants increase, more time will be needed to compile them and to build our game. And greater will be the size of our build.
- Loading several shader variants during the game can affect its performance (Create ShaderVariantCollections and preload them).
Last but not least, if you will not change the features of a shader during runtime, use #pragma shader_feature instead of #pragma multi_compile. In this case, only the variants with the setup previously set will be included in the build.
That’s it for today!