


When you are developing a game, no matter what is your target device, you’ll want to save draw calls in order to be able to keep pushing more stuff into your game using all the budget you have.
There are some ways of reducing the number of draw calls in a game. Usually, people resort either to combining meshes manually or following engine’s rules to creating batches. In Unity, you can combine meshes using their utility classes (Unity’s combine meshes utility) or configure your meshes and materials in order to make them batch together (Unity’s draw call batching doc.).
For static meshes, this kind of setup is easy and straightforward. However, for dynamic meshes, the things start to get a bit more complicated. These are the rules to be followed according to Unity’s documentation:
- Batching dynamic GameObjects has certain overhead per vertex, so batching is applied only to Meshes containing fewer than 900 vertex attributes in total.
- If your Shader is using Vertex Position, Normal and single UV, then you can batch up to 300 verts, while if your Shader is using Vertex Position, Normal, UV0, UV1 and Tangent, then only 180 verts.
- Note: attribute count limit might be changed in future.
- GameObjects are not batched if they contain mirroring on the transform (for example GameObject A with +1 scale and GameObject B with –1 scale cannot be batched together).
- Using different Material instances causes GameObjects not to batch together, even if they are essentially the same. The exception is shadow caster rendering.
- GameObjects with lightmaps have additional renderer parameters: lightmap index and offset/scale into the lightmap. Generally, dynamic lightmapped GameObjects should point to exactly the same lightmap location to be batched.
- Multi-pass Shaders break batching.
- Almost all Unity Shaders support several Lights in forward rendering, effectively doing additional passes for them. The draw calls for “additional per-pixel lights” are not batched.
- *The Legacy Deferred (light pre-pass) rendering path has dynamic batching disabled, because it has to draw GameObjects twice. *
If you have several dynamic meshes in your game, it might be hard to follow theses rules, specially the one about the number of vertex attributes. However, there is another technique, called GPU instancing, that can be used for this purpose as well.
Let’s say you have many dynamic meshes into your scene, but theses meshes are all instances of a same mesh. If this is the case, I have good news for you. By using GPU instancing you might be able to draw all of those instances with one draw call, and they can even have different properties in their material.
GPU instancing can be seen as an alternative to the use of batches when you have several instances of a same mesh in a scene.
But how does GPU instancing work?
In short:
- Send the mesh data to GPU (triangles, vertices, indices, etc.).
- Send to GPU a list of properties per instance (position, scale, rotation, etc.)
- Draw mesh x times at once, where x is the number of instances.
What you actually have to do in Unity:
- Create a shader with support for GPU instancing and use it in the mesh’s material (don’t forget to enable it).
- Add instances of your mesh into the scene.
- (Optional) Create a script to setup different material properties per instance.
Pros and Cons
Pros:
- You’re sending less data to GPU.
- Your mesh is not limited by 900 vertex attributes.
- Despite being the same mesh, you can have some variety by playing with the material properties.
Cons:
- No lightmap (do not forget to disable lightmap static).
- Always the same mesh.
- You have to create scripts to setup different material properties.
Of course there are more pros and cons, but I’m not going deep here.
Let’s see in practice
But first…
… Check if your target device supports it. From Unity’s documentation, those platforms and APIs support it:
- DirectX 11 and DirectX 12 on Windows
- OpenGL Core 4.1+/ES3.0+ on Windows, macOS, Linux, iOS and Android
- Metal on macOS and iOS
- Vulkan on Windows and Android
- PlayStation 4 and Xbox One
- WebGL (requires WebGL 2.0 API)
Basic example
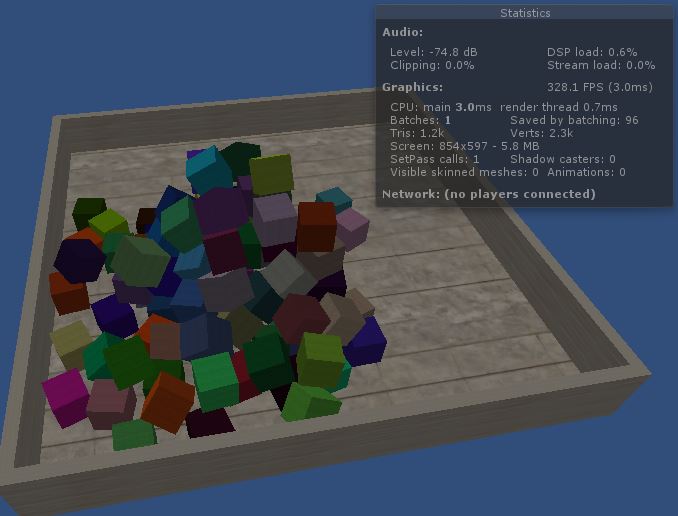
In this first example, let’s create a simple shader with GPU instancing capabilities and use it to replicate several cubes into a scene. The scene has a container made with boxes and a spawning point that creates cubes at according to a interval specified. This is the script responsible for spawning cubes:
using System.Collections;
using UnityEngine;

public class ObjectSpawnerBasic : MonoBehaviour
{
    public GameObject m_ObjectPrefab;
    public float m_SpawningInterval = 1f;

	void Start ()
    {
        StartCoroutine(SpawnObjects());
	}

    IEnumerator SpawnObjects()
    {
        WaitForSeconds waitForInterval = new WaitForSeconds(m_SpawningInterval);
        while(true)
        {
            GameObject go = Instantiate(m_ObjectPrefab, transform);
            go.transform.parent = transform;
            go.GetComponent<Rigidbody>().AddForce(new Vector3(Random.Range(0f, 100f),
            	                                              Random.Range(0f, 100f),
                                                              Random.Range(0f, 100f)));

            yield return waitForInterval;
        }
    }
}
And this is the simplest shader with GPU instancing that you can have. It basically enables GPU instancing. I added simple light interaction so the cubes don’t look flat.
Shader "Unlit/BasicInstancing"
{
	Properties
	{
		_Color ("Color", Color) = (1,1,1,1)
	}

	SubShader
	{
		Tags { "RenderType"="Opaque" }
		LOD 100

		Pass
		{
			Tags { "LightMode" = "ForwardBase"}

			CGPROGRAM
			#pragma vertex vert
			#pragma fragment frag

			// Enable gpu instancing variants.
			#pragma multi_compile_instancing

			#include "UnityCG.cginc"

			struct appdata
			{
				float4 vertex : POSITION;
				float3 normal : NORMAL;

				// Need this for basic functionality.
				UNITY_VERTEX_INPUT_INSTANCE_ID
			};

			struct v2f
			{
				float4 vertex : SV_POSITION;
				float3 normal : TEXCOORD01;
				float3 worldPos : TEXCOORD02;
			};

			fixed4 _Color;

			v2f vert (appdata v)
			{
				v2f o;

				// Need this for basic functionality.
				UNITY_SETUP_INSTANCE_ID(v);

				o.normal = UnityObjectToWorldNormal(v.normal);
				o.worldPos = mul(unity_ObjectToWorld, v.vertex).xyz;
				o.vertex = UnityObjectToClipPos(v.vertex);
				return o;
			}

			fixed4 frag (v2f i) : SV_Target
			{
				float3 normalDir = normalize(i.normal);
				float3 lightDir = _WorldSpaceLightPos0;

				// Simple light interaction.
				float3 diffuse = clamp(dot(normalDir, lightDir), 0.5, 1);

				return fixed4(diffuse * _Color.rgb, 1);
			}
			ENDCG
		}
	}
}
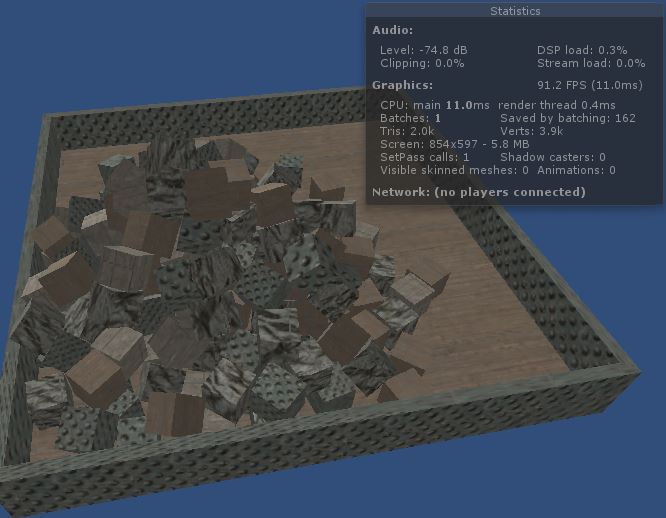
The cube prefab material uses the shader above and has the option ‘Enable GPU Instancing’ ticked. The scene is composed only by objects using this same material. As result, you can see that we have only one draw call for the whole scene below.
Playing with properties
Now, let’s create a script to change the properties of each cube by using material property blocks. In this case, each cube instance will have a different color.
To help managing each cube’s color property, we are going to use the following script:
using UnityEngine;

public class ObjectPropertyHandler : MonoBehaviour
{
    public Color m_Color;

    private void Start()
    {
        // Create property block and set to the mesh.
        MaterialPropertyBlock propertyBlock = new MaterialPropertyBlock();
        propertyBlock.SetColor("_Color", m_Color);
        GetComponent<MeshRenderer>().SetPropertyBlock(propertyBlock);
    }
}
It basically allows you to set the instance color property. Now, our cube spawner will be slightly different, I added a line that sets a random color to the cube instance as soon as it is created:
IEnumerator SpawnObjects()
{
	WaitForSeconds waitForInterval = new WaitForSeconds(m_SpawningInterval);
  	while (true)
  	{
    	GameObject go = Instantiate(m_ObjectPrefab, transform);
    	go.transform.parent = transform;
        go.GetComponent<Rigidbody>().AddForce(new Vector3(Random.Range(0f, 100f),
                                                          Random.Range(0f, 100f),
                                                          Random.Range(0f, 100f)));
    	ObjectPropertyHandler oph = go.AddComponent<ObjectPropertyHandler>();

    	// Choose random color.
    	oph.m_Color = new Color(Random.Range(0f, 1f), Random.Range(0f, 1f), Random.Range(0f, 1f), 1f);

    	yield return waitForInterval;
  	}
}
In the shader, now the color is a per instance property, i.e., it has to be declared in a special block and also has a different way of being accessed. I also added a texture (but not per instance).
Shader "Unlit/PropertyInstancing"
{
	Properties
	{
		_Color ("Color", Color) = (1,1,1,1)
		_MainTex ("Texture", 2D) = "white" {}
	}
	SubShader
	{
		Tags { "RenderType"="Opaque" }
		LOD 100

		Pass
		{
			Tags { "LightMode" = "ForwardBase"}

			CGPROGRAM
			#pragma vertex vert
			#pragma fragment frag

			// Enable gpu instancing variants.
			#pragma multi_compile_instancing

			#include "UnityCG.cginc"

			struct appdata
			{
				float4 vertex : POSITION;
				float3 normal : NORMAL;
				float2 uv : TEXCOORD01;
				UNITY_VERTEX_INPUT_INSTANCE_ID // Need this for basic functionality.
			};

			struct v2f
			{
				float4 vertex : SV_POSITION;
				float2 uv : TEXCOORD01;
				float3 normal : TEXCOORD02;
				float3 worldPos : TEXCOORD03;
				UNITY_VERTEX_INPUT_INSTANCE_ID // Need this to be able to get property in fragment shader.
			};

			// Per instance properties must be declared in this block.
			UNITY_INSTANCING_BUFFER_START(Props)
                UNITY_DEFINE_INSTANCED_PROP(fixed4, _Color)
            UNITY_INSTANCING_BUFFER_END(Props)

			sampler2D _MainTex; float4 _MainTex_ST;

			v2f vert (appdata v)
			{
				v2f o;

				// Setup.
				UNITY_SETUP_INSTANCE_ID(v);
				// Transfer to fragment shader.
				UNITY_TRANSFER_INSTANCE_ID(v, o);

				o.normal = UnityObjectToWorldNormal(v.normal);
				o.worldPos = mul(unity_ObjectToWorld, v.vertex).xyz;
				o.vertex = UnityObjectToClipPos(v.vertex);
				o.uv = TRANSFORM_TEX(v.uv, _MainTex);
				return o;
			}

			fixed4 frag (v2f i) : SV_Target
			{
				// Setup.
				UNITY_SETUP_INSTANCE_ID(i);

				float3 normalDir = normalize(i.normal);
				float3 lightDir = _WorldSpaceLightPos0;
				// Simple light interaction.
				float3 diffuse = clamp(dot(normalDir, lightDir), 0.5, 1);

				// Get per instance property value.
				fixed3 color = UNITY_ACCESS_INSTANCED_PROP(Props, _Color);
				fixed3 texColor = tex2D(_MainTex, i.uv);

				return fixed4(texColor * diffuse * color, 1);
			}
			ENDCG
		}
	}
}
Playing with texture
As seen in the previous example, we can change properties of instances while keeping the instancing working. However, we cannot have different textures per instance, what would demand a lot of memory by the way. But, there is a workaround for this: we can set an UV offset per instance as well as different scale and translation for the local UV space. In other words, we can have an texture atlas and sample it differently per instance.
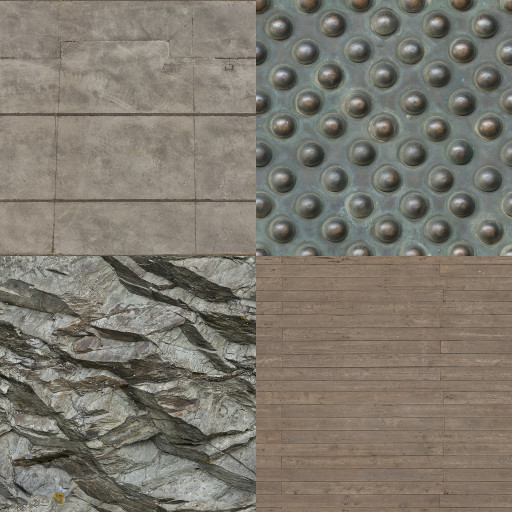
Images from www.textures.com
In this example, I’m going to use the atlas above with 4 textures. Each instance will handle a different cell pair related to a texture in the atlas ((0,0),(0,1),(1,0),(1,1)) and also its own tiling and offset. Our new shader will be the following:
using UnityEngine;

public class ObjectTextureHandler : MonoBehaviour
{
    public Vector4 m_TextureCellAndDimension;
    public Vector4 m_TextureTilingAndOffset;

    private void Start()
    {
        // Create property block and set to the mesh.
        MaterialPropertyBlock propertyBlock = new MaterialPropertyBlock();
        propertyBlock.SetVector("_TextureCellDim", m_TextureCellAndDimension);
        propertyBlock.SetVector("_TextureST", m_TextureTilingAndOffset);
        GetComponent<MeshRenderer>().SetPropertyBlock(propertyBlock);
    }
}
Our object spawner will then randomly select cell, tiling and offset per instance:
IEnumerator SpawObjects()
{
	WaitForSeconds waitForInterval = new WaitForSeconds(m_SpawningInterval);
	while (true)
	{
		GameObject go = Instantiate(m_ObjectPrefab, transform);
		go.transform.parent = transform;
		go.GetComponent<Rigidbody>().AddForce(new Vector3(Random.Range(0f, 100f),
                                                          Random.Range(0f, 100f),
                                                          Random.Range(0f, 100f)));

		ObjectTextureHandler oph = go.AddComponent<ObjectTextureHandler>();

		// Choose random texture cell, tiling and offset.
		oph.m_TextureCellAndDimension = new Vector4(Mathf.Round(Random.Range(0.0f, 1.0f)),
                                                    Mathf.Round(Random.Range(0.0f, 1.0f)), 2, 2);
		float tiling = Random.Range(1.0f, 3.0f);
		oph.m_TextureTilingAndOffset = new Vector4(tiling,
                                                   tiling,
                                                   Random.Range(0f,1f),
                                                   Random.Range(0f,1f));

		yield return waitForInterval;
	}
}
Finally, our shader will take that information and update the uv accordingly (apply the tiling and offset, sum cell pair and divide by atlas dimension).
Shader "Unlit/TextureInstancing"
{
	Properties
	{
		_MainTex ("Texture", 2D) = "white" {}
		_TextureCellDim ("Texture Cell and Dimension", Vector) = (0,0,0,0)
		_TextureST ("Texture ST", Vector) = (1,1,0,0)
	}
	SubShader
	{
		Tags { "RenderType"="Opaque" }
		LOD 100

		Pass
		{
			Tags { "LightMode" = "ForwardBase"}

			CGPROGRAM
			#pragma vertex vert
			#pragma fragment frag

			// Enable gpu instancing variants.
			#pragma multi_compile_instancing

			#include "UnityCG.cginc"

			struct appdata
			{
				float4 vertex : POSITION;
				float3 normal : NORMAL;
				float2 uv : TEXCOORD01;
				UNITY_VERTEX_INPUT_INSTANCE_ID // Need this for basic functionality.
			};

			struct v2f
			{
				float4 vertex : SV_POSITION;
				float2 uv : TEXCOORD01;
				float3 normal : TEXCOORD02;
				float3 worldPos : TEXCOORD03;
				UNITY_VERTEX_INPUT_INSTANCE_ID // Need this to be able to get property in fragment shader.
			};

			// Per instance properties must be declared in this block.
			UNITY_INSTANCING_BUFFER_START(Props)
                UNITY_DEFINE_INSTANCED_PROP(float4, _TextureCellDim)
                UNITY_DEFINE_INSTANCED_PROP(float4, _TextureST)
            UNITY_INSTANCING_BUFFER_END(Props)

			sampler2D _MainTex; float4 _MainTex_ST;

			v2f vert (appdata v)
			{
				v2f o;

				// Setup.
				UNITY_SETUP_INSTANCE_ID(v);
				// Transfer to fragment shader.
				UNITY_TRANSFER_INSTANCE_ID(v, o);

				o.normal = UnityObjectToWorldNormal(v.normal);
				o.worldPos = mul(unity_ObjectToWorld, v.vertex).xyz;
				o.vertex = UnityObjectToClipPos(v.vertex);
				o.uv = v.uv;
				return o;
			}

			fixed4 frag (v2f i) : SV_Target
			{
				// Setup.
				UNITY_SETUP_INSTANCE_ID(i);

				float3 normalDir = normalize(i.normal);
				float3 lightDir = _WorldSpaceLightPos0;
				// Simple light interaction.
				float3 diffuse = clamp(dot(normalDir, lightDir), 0.5, 1);

				// Get per instance property values.
				float4 texCellDim = UNITY_ACCESS_INSTANCED_PROP(Props, _TextureCellDim);
				float4 texST = UNITY_ACCESS_INSTANCED_PROP(Props, _TextureST);

				// Apply tiling and offset, and compute uv for cell specified.
				float2 uv = (texCellDim.xy + frac(i.uv * texST.xy + texST.zw))/texCellDim.zw;

				fixed3 texColor = tex2D(_MainTex, uv);

				return fixed4(texColor * diffuse, 1);
			}
			ENDCG
		}
	}
}
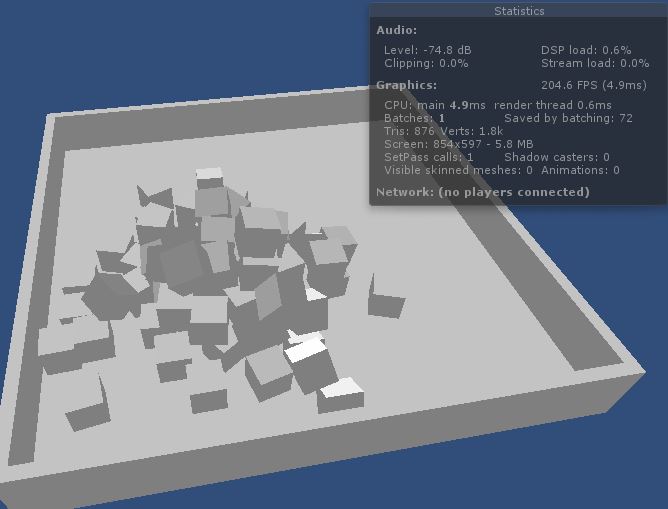
In the end, we get something like the following image. Note that the container parts can have a different setup by just adjusting their handlers individually. It’s not like “wow, what a beautiful use of GPU instancing!”, but it shows you (more or less) what you can do with it.
Conclusion
GPU instancing is a powerful technique that you could be using in your game. You can use your creativity to set different properties per instance in order to give variety to them. You could, for example, apply a different vertex offset per instance, or even use the instance ID as input for some algorithm in the shader.
This was just a simple and brief introduction to GPU instancing in Unity, for more information about the capabilities and limitations of this technique you can check Unity’s documentation.
The code and assets used in the examples are available on this github project.